|

ABOUT NETOBJECTS FUSION SITESTYLES
A SiteStyle is a collection of graphic elements that NetObjects Fusion applies to every page in your site. Your site's SiteStyle gives it a consistent look that survives any typographical variations that might be introduced by your site visitor's browser. When you assign a different SiteStyle to your site, NetObjects Fusion automatically updates every page in your site with the new look.
NetObjects Fusion comes with a number of pre-built SiteStyles from which you can choose. Among them you might find one that's appropriate for your site. If not, you can create your own custom SiteStyle. Or, if a SiteStyle works for almost every page in your site, you can customize it for the exceptional pages.
To create a custom look for your site, you create and edit a SiteStyle in Style view.
To customize a SiteStyle for a particular page, you change the look of any navigation bar, individual button, or banner using properties in Page view.
NetObjects Fusion SiteStyles consist of two kinds of elements:
- Images for buttons, banners, data list icons, line pictures, and page backgrounds. Button styles contain images for highlighted and non-highlighted buttons.
- Text attributes for the names of buttons and banners, and for normal text and regular and visited text links.
NetObjects Fusion derives the default text for buttons and banners from either the referenced page's name on the Page properties tab, or the name specified in the Custom Names dialog.
This usage note describes how to customize SiteStyles with NetObjects Fusion using the following methods:
- Change the images and text attributes for style elements by creating your own SiteStyles in Style view.
Change the style for a navigation bar or banner using properties in Page view, without affecting the overall SiteStyle. NetObjects Fusion uses the default text assigned to the image.
- Change the image for an individual button or banner using properties in Page view, without affecting the overall SiteStyle. NetObjects Fusion does not use the default SiteStyle attributes or assign text to the image. NetObjects Fusion displays the image only when you assign the SiteStyle that was selected when you chose the image.
Each NetObjects Fusion SiteStyle is composed of eleven style elements. The following table describes each style element.
|
|
|
|
|
|
Image containing the banner text |
|
|
Bullets next to items in a data list |
|
|
Image for lines drawn with Rule tool |
|
|
|
Image for navigation buttons |
|
|
Primary Button Highlighted |
|
|
Image for navigation buttons when "pressed" or selected |
|
|
|
Second image for navigation buttons, perhaps for child pages |
|
|
Secondary Button Highlighted |
|
|
Image for second navigation button when "pressed" or selected |
|
|
|
Color of text on the page |
|
|
|
Color of linked text on the page |
|
|
|
Color of linked text already explored by visitor |
|
|
|
|
By default, navigation banners and buttons obtain their images and text attributes from the SiteStyle assigned to the site. Each SiteStyle stores the images it uses in the following folder structure:
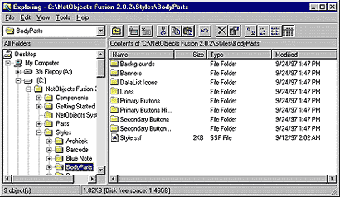
Note: Style.ssf is a file containing text and graphic information for the selected style, in this case, Body Parts.
NetObjects Fusion uses this folder structure to determine which image to use with which SiteStyle and element. Generally each SiteStyle element folder contains one GIF or JPG image, but a folder can contain many images. When you assign an image to a SiteStyle element in Style view, NetObjects Fusion automatically copies it to the appropriate folder within the SiteStyle folder. You can give a style element any name you want, but NetObjects Fusion style images generally take the name of the style and element, such as BodyPartsButton.gif, or BodyPartsLine.gif.
The text on the navigation buttons and banners appears in the font style, size, color, alignment, and orientation assigned to the navigation element in Style View.
When you preview, stage or publish your site, NetObjects Fusion creates a new GIF image containing the image and text for each button and banner. NetObjects Fusion places these new images in the auto_generated_images folder within the Preview, Stage, or Publish folder.

CREATING A NEW SITESTYLE
Create or collect images for your banner, buttons, lines, icons, and/or background. The images must be in the GIF or JPEG file format. You can use an image creation application to create the images, and you can use a conversion program to convert some image formats to the required formats.
In your open site, click the Style button.
In the Control bar, click the New Style button.
Enter a new style name, and click OK.
NetObjects Fusion displays a new Elements screen showing the list of style elements, and gives the list your new style name. NetObjects Fusion also creates a new folder for your style within the NetObjects Fusion 2.0\Styles folder.
Define each style element as described in the "Editing Styles" section of the NetObjects Fusion 2.0 User Guide. As you define each element, its image appears in the elements screen.
Click the Set Style button. Your pages assume the images and text attributes associated with your new SiteStyle.
CHANGING THE STYLE FOR ONE BANNER
You can change the style for an individual banner using properties in Page view.
- Navigate to the page containing the banner you want to change.
- Select the banner.
- In the Style section of the Banner properties tab, select Other, then in the drop-down list box, select the SiteStyle you want to use for the selected banner. The banner image changes to the new SiteStyle for the selected banner only. The banner text also appears in the new SiteStyle, showing the assigned page name.
CHANGING THE IMAGE FOR ONE BANNER
You can change the image on a selected banner using Banner properties in Page view. When you assign a new image to a banner in this way, NetObjects Fusion does not display the page or custom name on the banner. If you want text to appear on the banner, you must include the text in your banner graphic.
- Navigate to the page containing the banner you want to change.
- Select the banner.
- The Banner properties tab automatically appears. The Picture field shows the path to the assigned picture.
- Click the Browse button.
- In the Open File dialog that appears, select the image you want to use for the selected banner. The selected banner displays the new image. The image does not include the text style attributes or name that NetObjects Fusion normally assigns to the banner. NetObjects Fusion copies the banner graphic to the Banners folder in the current SiteStyle, and gives it a name consisting of the site name plus the page or custom banner name. For example, if your site name is MySite, and your page name is PageOne, the banner will be named MySite_PageOne.gif. If you assign a custom page or banner name, NetObjects Fusion uses the custom name. The original image remains unchanged.
The new image is part of the current SiteStyle only. If you change the style assigned to the site, the selected banner will no longer display the custom image.
Note: NetObjects Fusion checks the Banners folder for custom names and uses a custom image if one is present. If you subsequently change the page or banner name for any reason such that it no longer matches the custom graphic name, NetObjects Fusion reverts to the default banner image for the selected SiteStyle.
To change a banner back to its original SiteStyle, navigate to the appropriate Banners folder and delete the custom GIF. When there is no custom GIF file, NetObjects Fusion displays the banner and text in the default SiteStyle.
CHANGING THE STYLE FOR ONE NAVIGATION BAR
You can change the style for a navigation bar using properties in Page view.
- Navigate to the page containing the navigation bar you want to change.
- Select the navigation bar.
Tip: Drag a selection rectangle around the navigation bar to select the whole bar and automatically display the Nav Bar properties tab.
- If necessary, click the Nav Bar properties tab.
- In the Style section of the Nav Bar properties tab, select Other, then in the drop-down list box, select the style you want to use for the selected navigation bar. The images change to reflect the new SiteStyle for the selected navigation bar only. The button text appears in the new SiteStyle.The button names are derived from the Name field or Custom Names dialog in the Page properties tab, as usual.
Tip:If you want some of the pages in your site to display a third and fourth button style, create a new SiteStyle, then assign the primary and secondary buttons to the pages you want to display the third and fourth button style.
CHANGING THE IMAGE FOR ONE BUTTON
You can change the image on each individual button in a navigation bar using Button properties in Page view. When you assign a new image to a button in this way, NetObjects Fusion does not display the page or custom name on the button. If you want text to appear on the button, you must include the text in your button graphic.
- Navigate to the page containing the navigation button you want to change.
- Select the button by clicking on it. The Button properties tab automatically appears, showing the selected button name and assigned picture.
- Click the Browse button.
- In the Open File dialog that appears, select the image you want to use for the selected button. The selected button displays the new image. The image does not include the text style attributes or name that NetObjects Fusion normally assigns to the button. NetObjects Fusion copies the button graphic to the appropriate button folder in the current SiteStyle, and gives it a name consisting of the site name plus the page or custom button name. For example, if your site name is MySite, and the page name is PageTwo, the button will be named MySite_PageTwo.gif. If you assign a custom page or button name, NetObjects Fusion uses the custom name. The original image is unchanged.
The new image is part of the current SiteStyle only. If you change the style assigned to the site, the button will no longer display the custom image.
Note: NetObjects Fusion checks the appropriate button folder for custom names and uses a custom image if one is present. If you subsequently change the page or button name for any reason such that it no longer matches the custom graphic name, NetObjects Fusion reverts to the default button image for the selected SiteStyle.
To change a button back to its original SiteStyle, navigate to the appropriate button folder and delete the custom GIF. When there is no custom GIF file, NetObjects Fusion displays the button and text in the default SiteStyle.
REMOVING A CUSTOM IMAGE
Use Windows Explorer or the Macintosh Finder to navigate to the NetObjects Fusion 2.0\Styles folder that contains the custom image.
Select the image you want to remove.
Press Delete, or drag the image to the Recycle Bin or the Trash.
Return to NetObjects Fusion Page view.
The custom image is replaced by the default style image.
|
|
