|

CENTERING
NetObjects Fusion generates HTML tables to describe your layouts. This means your site visitor views the page exactly as you laid it out in NetObjects Fusion. One side effect is that the size of your page is fixed. If your site visitor's browser is set to a width different than what you specified in the Layout properties, the browser cannot move or resize the contents of the page. If the browser window is wider than your page, unbalanced white space might appear on the right. If it is narrower, content on the right side might not be visible.
The vast majority of site visitors are likely to be able to view pages designed using NetObjects Fusion's default width. If you create pages with a different width, consider centering your contents. Note that the <CENTER> tag is not standard HTML and generally is not considered good form to use it because it lacks visual variety and appeal. But, centering allows the browser to center your content in the available width, and is supported by both Netscape Navigator and Microsoft Internet Explorer.
To Center a Page's Content:
- Navigate to the page you want to center and choose Layout Script from the Page menu.
The Script dialog appears with Inside Head Tag, Inside Body Tag, and Beginning of Body fields.
- In the Script dialog, type <CENTER> in the Inside Head Tag box.
- Click OK.
The layout will be centered. The relative positions of elements will not change.
Preview the page and resize your browser's width to see how the tag works.

METATAGS
Meta tags give you control over the keywords indexed for your site by a Webspider, an automatic indexing system deployed by search engines such as Yahoo and Alta Vista. When you use Meta tags to provide relevant, attractive descriptions and keywords to these search engines, they can do a better job of guiding interested visitors to your site. Your site visitors will not see the Meta tag when viewing your site with a browser. But if
a Webspider visits your site and finds no Meta tag, it reads and attempts to index just the first few lines of text on the page, which can lead to unpredictable results.
You can add meta tags in two locations:
- MasterBorder. The meta tag is automatically added to the HTML of each page with the same MasterBorder.
- Layout area. The meta tag appears only in the HTML for this page.
Notice that the above list does not include AutoFrames. Any script you add to an AutoFrame is included in the content file for the frame, not the frameset file, which is where most Webspiders look for meta tags.
To Add a Meta Tag:
- Select the location for your script and open the Script dialog:
- Right-click (Windows) or Control-press (Macintosh) in the MasterBorder and choose Master Script from the pop-up menu. This adds the meta tag automatically to each page with the same MasterBorder.
- Right-click (Windows) or Control-press (Macintosh) in the layout area and choose Layout Script from the pop-up menu. The meta tag will be included with this page only.
NetObjects Fusion displays the Script dialog with Inside Head Tag, Inside Body Tag, and Beginning of Body fields.
- In the Inside Head Tag field of the Script dialog, type:
<META HTTP-EQUIV="Description" NAME="Description" CONTENT="The Meta tag lets search engines index your Web site."><META HTTP-EQUIV="Keywords" NAME="Keywords" CONTENT="Meta tag, search engines, Webspiders">
- Click OK.
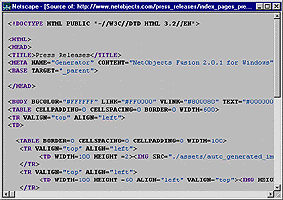
Click Preview, and when your page appears in the browser, choose its View Document Source command.
The source HTML appears. As you can see in the following dialog, the meta tag is added to the source below the <HEAD> tag.
ADDING AN IMAGE TO A TEXT BLOCK
This method lets you take advantage of the HTML tags that wrap text around images.
To Add an Image to a Text Block:
Draw a text block on your page.
This reserves space for the cell. If you are using NetObjects Fusion version 2.0.1 for Windows or NetObjects Fusion 2.0 for Macintosh, set the Lock Size option on the text block's properties tab.
Add the text you want to wrap around the image.
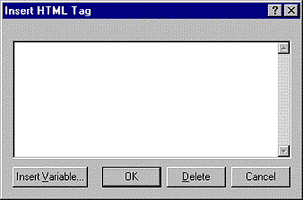
Select an insertion point in the text, then choose Insert HTML from the Text menu. The Insert HTML tag dialog appears.
- Type the image tag for the image you want; for example:
- <img src="./assets/images/Bicycle.gif" width="35" height="35" align="left">
- This example assumes the image appears on the Home page, and that the image will be stored in your site's /assets/images folder. Depending on where you arrange to store the image, you might have to use a different path. For example, If your image appears on another page, you'd use a ../assets/images relative reference. See step 6 for how to make sure NetObjects Fusion puts the image in your /assets/images folder. See HTML reference sources for more information on using the attributes of the <img> tag.
- Click OK to close the dialog.
- Make sure the image file is stored where the <img> tag directs the browser to look.
If your tag includes a path similar to the one in the example above, you'll must make sure NetObjects Fusion will include the image in the /assets/images folder of your site. Here are two methods.
Go to Assets view, click the New File button, and in the dialog that appears, choose your image. Now the image is an asset of your site, but because NetObjects Fusion does not verify whether images in scripts are "in use," you must disable the Stage and/or Publish Changed Assets Only option so that NetObjects Fusion always includes it in your /assets/images folder.
Place the image directly on the page in an area where a single pixel wont be noticed. On the image's properties tab, select the Stretch option, then drag to resize the image to 1 x 1 pixels. This makes the image an asset of your site. NetObjects Fusion will recognize it as being in use, and so will automatically include it in your /assets/images folder.
- Stage your site, use your browser's Open command to load your site, and if needed navigate to the page with the text block.
You'll see the image in place on the page. Simply previewing will not display the image. You might have to adjust the size of your text block to accommodate the image. If you are using NetObjects Fusion 2.0.1 for Windows or NetObjects Fusion 2.0 for Macintosh, be aware that when a site visitor's browser is set to display a smaller font than the one you use as you design, that the text block will not shrink to fit and any elements below the text block will not move up to fill the empty space as they normally do.
PUTTING HTML IN A CELL
You can use a text block to reserve any area of a page for your own HTML scripts. When NetObjects Fusion creates the HTML for the page, it gives your HTML in its own table cell. For example, you might use this to insert a complex table you have hand-coded in an HTML editor. In the published HTML, your hand-coded table would appear in a cell of the table NetObjects Fusion creates to describe the page.
You can use this method to reserve page space for JavaScript as well, as described in Adding Java Applets and JavaScript
To Reserve Page Area for Imported HTML:
Draw a text block on your page. This reserves space for the cell. If you are using NetObjects Fusion version 2.0.1 for Windows or NetObjects Fusion 2.0 for Macintosh, set the Lock Size option on the text block's properties tab.
Click the Script button on the text block's properties tab.
Put your HTML in the Before Element field of the Element Script dialog that appears. You can type it, paste it in from another application, or click the Insert button and import it in a text file.
Close the dialog, stage your site, use your browser's Open command to load your site, and if needed navigate to the page with your HTML.
You'll see whatever you coded in place on the page.
|
