|

USING LAYOUT SCRIPTS
You can attach layout scripts to the following elements:
- A page's layout: The script applies to the current page only.
- MasterBorder: The script applies to all the pages with that MasterBorder style.
- AutoFrame: NetObjects Fusion places the script in the content page for the AutoFrame. For example, if you add a script to a left frame, NetObjects Fusion places the script in the content file for the left frame, not the frameset file. If you convert the AutoFrame back to a MasterBorder, any script attached to the AutoFrame is deleted. See AutoFrames and Scripted Frames for more information on AutoFrames.
Open the Layout Script dialog by one of these methods:
- Layout scripts: Choose Layout Script
from the Page menu, or choose Layout Script
from the pop-up menu in the layout area.
- Master scripts: Choose Master Script
from the pop-up menu in the MasterBorder area, or click the Script... button on the MasterBorders tab.
- Frame scripts: Choose Frame Script... from the pop-up menu in the AutoFrame area, or click the Script... button on the Frame tab.
- For Windows, right-click to display the pop-up menu and for Macintosh, Control-press to display the pop-up menu.
The Script dialog appears:
2. Click the field in which you want to place your HTML code.
Inside Head Tag field: NetObjects Fusion adds the code as a new line between the <HEAD> tag and the </HEAD> tag. Use this field only to add complete and valid tags into the <HEAD> area.
Inside Body Tag field: NetObjects Fusion adds the code inside the <BODY> tag, just before the closing bracket. Use this field only to add attributes for the <BODY> area.
Beginning of Body field: NetObjects Fusion adds the code on a new line just after the <BODY> tag. Use this field to enter complete tags and scripts.
3. Place your HTML or script in the selected field.
You can type HTML or script text, you can click Insert... and select an HTML or script file (ASCII text format) from your hard disk, CD-ROM, or LAN, or you can paste in HTML or script text you copied from another application.
HTML code gets inserted exactly as typed. This means that in the <BODY> section, scripts must include the <SCRIPT> and </SCRIPT> tags. If it is unclear how the code is being inserted, preview the site and look at the source. You can also use the Cut, Copy, Paste, and Undo buttons or their standard keyboard equivalents to edit text in any field.
4. To insert a variable, click the Variable... button.
If your script requires a variable, see your NetObjects Fusion 2.0 User Guide to learn how to use variables.
5. Click OK.

USING ELEMENT SCRIPTS
You can attach layout scripts to the following elements:
- A page's layout: The script applies to the current page only.
- MasterBorder: The script applies to all the pages with that MasterBorder style.
- AutoFrame: NetObjects Fusion places the script in the content page for the AutoFrame. For example, if you add a script to a left frame, NetObjects Fusion places the script in the content file for the left frame, not the frameset file. If you convert the AutoFrame back to a MasterBorder, any script attached to the AutoFrame is deleted. See AutoFrames and Scripted Frames for more information on AutoFrames.
Open the Layout Script dialog by one of these methods:
- Layout scripts: Choose Layout Script
from the Page menu, or choose Layout Script
from the pop-up menu in the layout area.
- Master scripts: Choose Master Script
from the pop-up menu in the MasterBorder area, or click the Script... button on the MasterBorders tab.
- Frame scripts: Choose Frame Script... from the pop-up menu in the AutoFrame area, or click the Script... button on the Frame tab.
- For Windows, right-click to display the pop-up menu and for Macintosh, Control-press to display the pop-up menu.
The Script dialog appears:
2. Click the field in which you want to place your HTML code.
Inside Head Tag field: NetObjects Fusion adds the code as a new line between the <HEAD> tag and the </HEAD> tag. Use this field only to add complete and valid tags into the <HEAD> area.
Inside Body Tag field: NetObjects Fusion adds the code inside the <BODY> tag, just before the closing bracket. Use this field only to add attributes for the <BODY> area.
Beginning of Body field: NetObjects Fusion adds the code on a new line just after the <BODY> tag. Use this field to enter complete tags and scripts.
3. Place your HTML or script in the selected field.
You can type HTML or script text, you can click Insert... and select an HTML or script file (ASCII text format) from your hard disk, CD-ROM, or LAN, or you can paste in HTML or script text you copied from another application.
HTML code gets inserted exactly as typed. This means that in the <BODY> section, scripts must include the <SCRIPT> and </SCRIPT> tags. If it is unclear how the code is being inserted, preview the site and look at the source. You can also use the Cut, Copy, Paste, and Undo buttons or their standard keyboard equivalents to edit text in any field.
4. To insert a variable, click the Variable... button.
If your script requires a variable, see your NetObjects Fusion 2.0 User Guide to learn how to use variables.
5. Click OK.
BEFORE AND AFTER ELEMENT SCRIPT EXAMPLE
Place a block of text on your page with the Text tool.
Type in this text: BIG.
Right-click (Windows) or Control-press (Macintosh) the text block and choose Element Script.
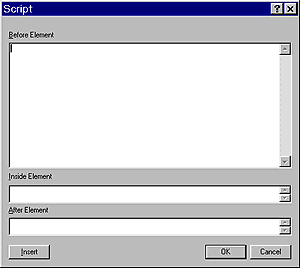
The Script dialog appears, with Before, Inside, and After Element Tag fields.
In the Before Element field, type in the tag <FONT SIZE=+2>.
In the After Element field, type </FONT>.
Click OK to close the dialog, then click Preview.
When the page appears in your browser, BIG is displayed in type two increments larger than the visitor's browser default font size.
INSIDE ELEMENT SCRIPT EXAMPLE
Suppose you place a picture Airplane.jpg on your Home page. For this element, NetObjects Fusion generates the following HTML:
<IMG HEIGHT=152 WIDTH=177 SRC="./assets/images/Airplane.jpg" BORDER=0 ALT="Picture">
If you enter the following in the Inside Element Tag of the Element script dialog:
lowsrr="./assets/images/airplane_low.jpg"
NetObjects Fusion adds it as an attribute inside the element tag:
<IMG HEIGHT=152 WIDTH=177 SRC="./assets/images/Airplane.jpg" BORDER=0 ALT="Picture" lowsrc="./assets/images/airplane_low.gif">
Lowsrc is a tag that displays a lower resolution image while the higher-resolution image is loading. The next step in making this tag work is to make sure NetObjects Fusion will include the lower-resolution image in the /assets/images folder of your site. Go to Assets view, click the New File button, and in the dialog that appears, specify the lower-resolution image, in this case airplane_low.jpg. Now the image is an asset of your site, but because NetObjects Fusion does not verify whether images in scripts are "in use," you must disable the Stage and/or Publish Changed Assets Only option so that NetObjects Fusion always includes it in your /assets/images folder.
|
