
You can add an action to any object, Layout, or MasterBorder. NetObjects Fusion comes with several actions you can apply by choosing options from menus. Just specify a trigger event to start the action, the action itself, and the object you want it to target.
You can add any number of actions to an object. For example, one action might cause a button to highlight when you mouse over it, while another action removes the highlighting when you move the mouse away.
Note:
Because MasterBorders can apply to several pages, any object in the Layout that’s targeted by an action involving a MasterBorder must be available in all Layouts using that MasterBorder.
In Page view, select the item you want to trigger the action, and click the Actions tab on the Properties palette.
Clear the Object initially visible in browser option to hide the object when the page loads. For example, if an action targeting this object makes it fly onto the page, you will want to hide the object until the fly action is triggered.
Click the Add Action button  on the Properties palette to add a new action.
The Set Action dialog appears.
Specify the action’s trigger event in the When field.
Click the When menu button  next to the field, point to a trigger category, and click the trigger event you want.
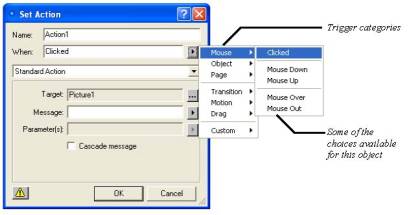
The trigger events available depend on the object you’re adding the action to. These can include:
Mouse. Mouse options do not apply in some cases, including text objects, Layouts, and frames. Mouse options are for triggering an action when the site visitor clicks the object, mouses down or up (for example, you might display a pushed-in picture of a button on mouse down), or moves the pointer over or off the object.
Object. Triggers the action when the object is either hidden or shown as the result of another action that targets this object.
Page. Triggers the action when the page finishes loading, or when the site visitor opens another page.
Transition, Motion, Drag. In a sequence of actions, triggers the action at the start or end of another action that targets this object. For example, ending a drag might trigger another action to restore the object you dragged to its original position.
Custom. These are messages you create to trigger one action with another for specialized action sequences. See Tailoring Actions with Custom Messages.
Make sure Standard Action is displayed in the action type drop-down list. For information about scripted actions, see Scripting Your Own Actions.
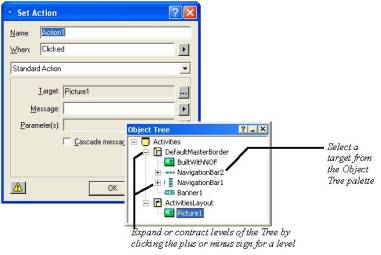
Specify the object your action is to target in the Target field.
The action can target any object on the page, the Layout itself, or even the MasterBorder. By default, it targets the object triggering it. To target another object, click the Target menu button  next to the Target field and choose an object from the Object Tree palette. If you add a “Fly Out to Top Right” action to one picture and target it at another, for example, clicking the first picture can trigger the target picture to fly off the page.
You can also cascade an action to several objects at once; see Targeting Several Objects with One Action.
Specify the action you want to occur in the Message field.
Click the Message menu button  next to the Message field, point to a category, and click the action you want.
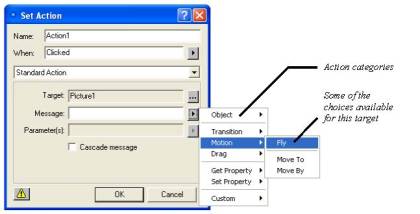
Your choices for actions depend on the object you’re targeting. These can include:
Object. Includes options for hiding, showing, or otherwise arranging the target in relation to other objects; adding a delay between the trigger event and a subsequent action; loading different images to use for a picture, say to show a highlighted button when a site visitor mouses over it. For examples, see Creating a Button Rollover and Sequencing Actions for a Slide Show.
Transition, Motion. Redraws the object in any of several ways, or causes it to move in some way across, on, or off the page.
Drag. Makes an object stick to the pointer so site visitors can drag it around the page. One action might make the object stick on mouse down, while another lets the object go on mouse up. For an example, see Colliding One Object with Another.
Get Property, Set Property. These actions are typically used as components of scripted actions or parameter values, in particular when working with values entered in forms. For an example, see Customizing Default Actions.
Location, Dialog, Window, Browser. These options appear on the menu if the target is a Layout or MasterBorder. Use these options to open another URL after an animation occurs, display a dialog, set the size, position, or some other state of the window; or check what browser the site visitor is using, say to trigger a different set of actions depending on the browser type.
Custom. These are messages you create to trigger one action with another in specialized action sequences. See Tailoring Actions with Custom Messages.
If the action you specify requires parameters or can be tailored with additional parameters, specify a value or expression in the Parameters field.
Click the Parameter menu button  next to the Parameters field and click an available option. For example, for a Fly message you can choose a direction parameter like In from Top.
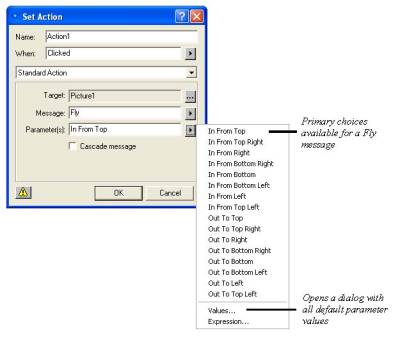
For some actions, you can click Values on the Parameters menu to choose from a wider selection of values.
The Parameter Values dialog appears, listing all parameters currently available for this action and their default values.
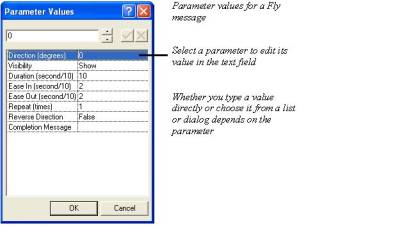
To modify a value, select a parameter and edit its value in the field at the top of the dialog. Depending on the parameter, you might type the value, or choose it from a drop-down list, or from the Color Picker, Picture File Open dialog, or Link dialog. Click OK when you’re done editing parameters.
You can also write your own JavaScript expression to generate a parameter value. See Scripting Parameter Values.
Click OK in the Set Action dialog.