In Page view, select the Plug-In tool  from the Plug-ins toolbar.
Draw a box to indicate where you want to position the file.
Although NetObjects Fusion supports a wide variety of media files, you might have other formats, such as Adobe Acrobat PDF files, that you want to include in your site. You can place other files, including Adobe Acrobat, VRML, RealSpace FlashPix files, and Headspace Beatnik files, using the Plug-In tool.
When a site visitor clicks the document’s icon, the file appears in the visitor’s browser or downloads to the visitor’s system. When you insert a file using the Plug-In tool, site visitors need the appropriate plugin for their browser and platform to use the file.
To insert a file using the Plug-In tool:
In Page view, select the Plug-In tool from the Plug-ins toolbar.
Draw a box to indicate where you want to position the file.
The Open dialog appears.
Select a file from your hard disk or LAN, or select a file that was already used in the site from the Plug-in Assets tab.
To display the various file types that NetObjects Fusion supports, use the Files of type drop-down list.
To insert a file that is not explicitly supported by NetObjects Fusion, choose All Files in the Files of type drop-down list, then select the file.
Click Open.
The plug-in placeholder image appears on your page, and the Plug-In Properties palette appears. The name of the file you selected appears in the File field on the General tab.
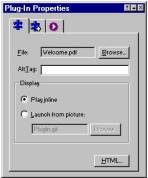
To provide text for the browser to display if it cannot display the file, enter a description in the AltTag field.
In the Display section, select:
Play inline to display the file on the page in your site.
Launch from picture to use a picture other than the plug-in icon to represent the plugin. When site visitors click the image, the plugin opens in the window. Click Browse and select an image file.
Click the HTML button to insert HTML tags and scripts. See Working with HTML Directly.
Select the Advanced tab.
The Advanced options appear.
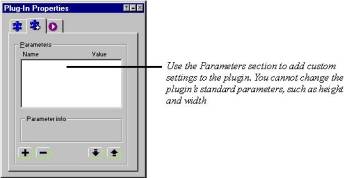
Set the parameters. Because you can add different parameters for different files, see the associated user guide.
To edit parameters that appear in the Parameters section, double-click the parameter. Enter the value in the Add Plug-In Parameter dialog.
To add a parameter, click the plus (+) button and enter the parameter name and value in the Add Plug-In Parameter dialog.
To remove a parameter, select it and click the minus (–) button.
To change the order of the parameters, click the Up or Down arrow buttons. The selected parameter moves up or down in the parameters list.
You can add an action to an object using the Actions tab. See Building Dynamic Pages.