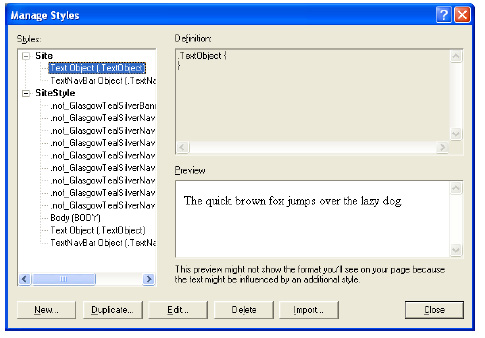
In Page view, from the Text menu, choose Manage Styles.
The Manage Styles dialog appears.
The pane on the left lists the currently defined HTML tag styles.
The list of styles can include styles that are specific to the current page, the entire site, or part of the SiteStyle.
You can also create custom styles for the navigation bar, a text object, lists, and so on, for the styles listed in the pane on the left.
To create a new style, click New or Duplicate.
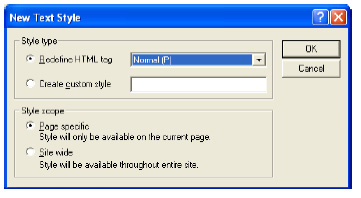
The New Text Style dialog appears.
The Duplicate Text Style dialog box is similar. Duplicating a style is a quick way to give it a different scope. For example, you can duplicate the H1 style to the H2, H3, and H4 headings and then edit them individually.
In the Style type section, select:
Redefine HTML tag and choose a tag to edit from the drop-down list.
Create custom style and type a name for the style in the field.
A period is added to the custom style’s name, such as .customstylename. In the generated code, the custom style is then referred to as class=customstylename.
Select a style scope for the new style.
Page specific. If you select this option the new style is only available for the current page. If you are redefining an existing tag, the original definition is still in force for the rest of the site. If you create a new style, it is not available on any other page of the site.
Site wide. If you select this option the new style is available throughout the current site. If you are redefining an existing tag, all instances of this tag change throughout the site. For example, if you change the H1 font color to red and select Site wide, all text in the site with that style applied becomes red.
Click OK.
The Text Format dialog appears. You can now set the attributes for each feature of the style. See Formatting Paragraphs and Formatting a List for details.