NetObjects Mosaic Quick Start Guide
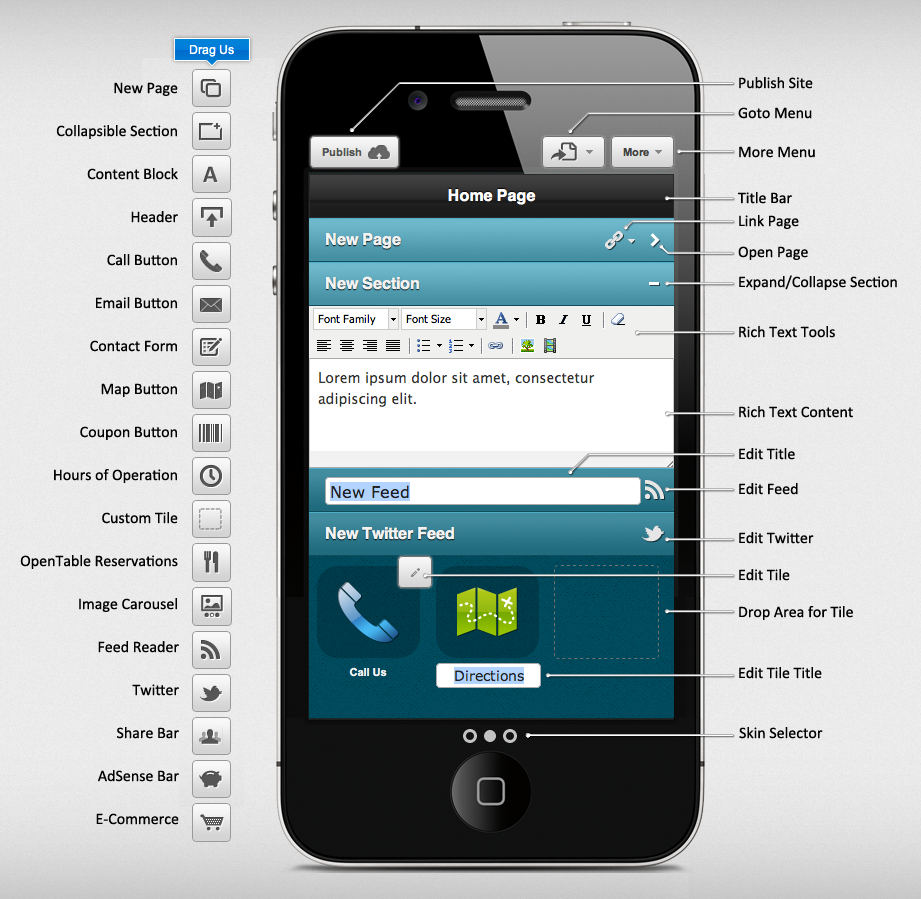
Workspace
The workspace consists of a toolbar on the left, stage in middle and a menubar at the top of the stage.
Basics
Drag and Drop - The workspace relies heavily on dragging elements from one location and dropping them into their desired position within the stage. When the mouse cursor is over an element that can be dragged the cursor will change to an open hand ![]() . While dragging elements over the stage the nearest drop location will be highlighted by a dashed bordered
. While dragging elements over the stage the nearest drop location will be highlighted by a dashed bordered ![]() .
.
Browser requirements: Internet Explorer 9+, Google Chrome 10+, FireFox 4+, Safari 5+, Opera 11+
Toolbar
The toolbar located on the left side of the workspace contains several draggable tiles. Each of the tiles can be dragged from the toolbar and dropped onto the stage. Placing a tile onto the stage creates a new element for your mobile site.
Stage
The stage area is where you arrange and edit all of your mobile site’s content. Content can be arranged by dragging elements to their desired position. Most elements will auto-open the editing dialog box when dragged to the stage.
Publish Button
The Publish button ![]() will make your site available on the Internet. The first time you publish you’ll be prompted to choose a subdomain, which visitors can use to view your site.
will make your site available on the Internet. The first time you publish you’ll be prompted to choose a subdomain, which visitors can use to view your site.
Tips: After publishing, skip the need of manually typing your new site address into your smartphone by using the “Email me a Link” feature.
Change your subdomain in the Site Settings dialog.
Goto Menu
The Goto menu ![]() provides a quick way to open existing pages, delete and rename the current page, or create a new page.
provides a quick way to open existing pages, delete and rename the current page, or create a new page.
More Menu
SiteStyles
SiteStyles are an easy way to dramatically change the look and feel of your entire site. Each SiteStyle consists of a color coordinated palette, buttons, and tile icons.
see: How do I change the look and feel of my site?
Site Settings
- Site Title: Choose a brief name for your site that will be combined with each page’s title and displayed in the browser’s title bar or when a page is bookmarked.
- Site Description: Provide a brief (150-160 characters) summary of your site to be displayed on search engines results pages.
- Subdomain: Choose an address for visitors to go directly to your mobile website.
see: How do I change where my site publishes to? - Redirect snippet: Automatically redirect smartphone visitors from your desktop site to your mobile site.
see: How do I redirect smartphone visitors from my desktop site to my mobile site? - Return to Desktop Site Button: Select this option to include a button that returns your visitors to your desktop site.
- QR Code: Click the QR Code image to download a print quality version. This image can then be used on flyers, brochures, business cards, etc. When someone scans the QR Code with their smartphone they will be taken to your mobile site.
Site Analytics
After your site has been published for a few days you’ll be able to generate site traffic reports. The report is filtered by date range and traffic data analyzed across five categories.
- Visitors: Two line graphs display unique visitors plotted over a date range. The smaller and secondary line graph can be used to zoom in on a specific timespan. To zoom in click and drag across the secondary line graph, releasing at the end of the desired period.
- New vs. Returning: Use this pie chart to easily compare the number of visitors coming to your mobile site for the first time versus your repeat visitors.
- Traffic Type: This pie chart categorizes traffic into Direct (using your site’s address), Search (found on search engines), Campaigns (search engine Ads), and Referrals (other websites).
- Most Viewed Pages: If you mobile site has multiple pages they will be ranked by the number of visits on this list.
- Top Keywords: When traffic comes to your site from search engines the search term used to find your site is saved and ranked on this list.
Account Settings
Manage your contact email, password and subscriptions.
- Email Address: This address is used to sign in to the app and for any notifications. When changed a new verification email will be sent out. To validate the new email address please follow the instructions included in the email. If you do not receive the verification email within an hour please check your spam folder and verify the spelling of your new email address.
- Password: Your password is a secure word or string of characters used to sign in to the app. Your password is stored with encryption using the most stringent security guidelines. For your additional security it is highly recommended to not use any password more than once. Do not reuse the same password you have used for your email accounts, financial services, computer, etc.
- Subscription & Billing
Subscription & Billing
Manage the your subscriptions and billing information from the Subscriptions dialog.
More > Account Settings > Subscriptions & Billing Settings
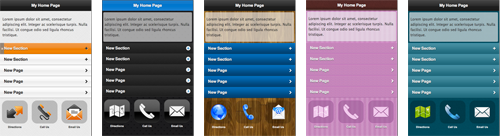
Customizing your Workspace
You can switch the live preview for your mobile site by selecting from Android, iPhone, or Windows Mobile skins. Click between the skins using the Skin Selector buttons. Your skin will immediately update.
Adding Content
Pages
An easy way to add a new page is to create a link from your current page to your new page.
- From the toolbar drag a New Page tile
 onto the stage. This will create a new bar on stage that will link to your new page.
 - Click the right chevron icon
 located on the right side of the bar to open your new page. Notice the new page includes a Header with a title of “Untitled #”.
 - You can now edit the page’s title add new content.
Alternatively you can add a new page from the Goto menu, however a link to the new page will need to be manually created. Links to pages can be created from the Rich Text Editor or a new page bar’s Link to page menu ![]() .
.
Collapsible Sections
Group content into regions that can be selectively collapsed into a single row to with Collapsible Sections. This element is used to efficiently utilize the limited screen space available on mobile devices.
- From the toolbar drag a Section tile
 onto the stage.
 - By default new sections are expanded so that content can be added. To collapse the section click the collapse button in the upper right corner of the section.
Content Block
Content blocks are the most common tool you’ll use while building out your mobile site. Content blocks can contain elements such as text, images, lists, video and links.
- From the toolbar drag a Content tile
 onto the stage.
 - Content blocks have their own toolbar.
Alternatively you can create a new content block by clicking inside an empty collapsible section or page area. When the mouse cursor is over an empty area where this is possible the cursor will change to a text caret ![]() .
.
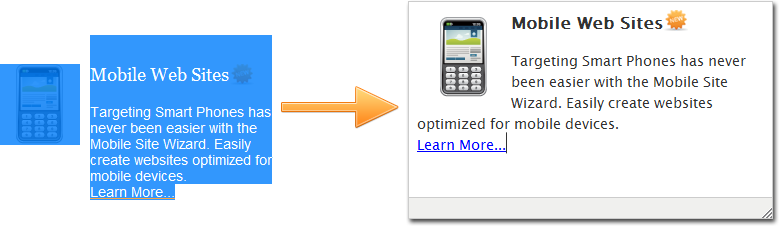
Smart Cut & Paste
NetObjects Mosaic utilizes Smart Cut & Paste technology to intelligently format and display pasted content. This feature has many uses, for instance, a user can copy portions of their desktop website and paste directly into a Content Block. Mosaic will calculate and cleanup the formatted code, scale and optimize images appropriately for a variety of mobile device screen resolutions.
Here is a sample from the NetObjects.com home page:
Button Tiles
The second set of tiles in the toolbar allow you to add compact UI elements to your mobile site. These tiles can be arranged into grids of up to 3 columns on a page or nested inside of collapsible sections. Each tile acts like a mini-app designed to compliment a specific feature.
Call Button - Launch the smartphone’s dialer app.
Email Button - Launch the smartphone’s email app.
Contact Form - Survey visitors and have the results emailed.
Map Button - Launch the smartphone’s mapping app.
Coupon Button - Generate QR codes that can be scanned as coupons.
Hours of Operation - Display your store hours in a popup.
OpenTable Reservations - Gives visitors the ability to reserve a table at your establishment.
Image Carousel - Create striking carousel photo galleries.
Custom Tile - Create a button with your own icon.
Adding a button tile
- Drag the desired tile from the toolbar onto the stage.
- The tile will auto-open the editing dialog window. It can then be edited manually by moving the mouse cursor over the tile and then clicking the edit button
 in the upper right corner. You can also edit a tile by double clicking on it.
 - The tile’s label text can be edited by moving the mouse cursor over the label until the cursor changes to a text caret
 , then clicking.
Header
The header bar displays both the page’s title and site navigation controls. Each page can only have one header placed at the top of the page.
Adding a header bar
- Drag the header tile
 from the toolbar to the top of the stage.
Bars
The third set of tiles in the toolbar allow you to integrate your mobile site with 3rd party services such as Twitter, Google Adsense, Flickr, Facebook, and many others. When one of these tiles is added to the stage it is represented as a bar occupying a single row of content on the page.
Feed Reader - Popular sites, blogs and social apps offer content syndicated as a RSS/Atom feeds. Using their feed URLs 3rd party content can easily be integrated into your mobile site. Depending on the feed’s content a distinct layout out will be applied. For example Flickr feeds are published as photo galleries. Some example feeds are provided in the editing dialog.
Twitter - Automatically have you or any other user’s tweets replicated on your mobile site.
Share Bar - Promote your social media accounts by letting users follow you on Twitter or like your FaceBook page. Even you don’t have any social media account you can still let your visitors promote your mobile site via their social services such as FaceBook, Twitter, Google+ and email.
Google AdSense Bar - Earn money by placing Google AdWords ads on your mobile site.
E-Commerce - Sell your products and services with options for Google Checkout or PayPal.
Adding any of the above bars
- From the toolbar drag a tile onto the stage.
- Edit the bar’s settings by moving the mouse cursor to the far right side of the bar and then click the edit button. Each edit button icon
 ,
,  or
or  corresponds to the type of bar.
 - The bar’s title text can be edited by moving the mouse cursor over the title until the cursor changes to a text caret , then clicking.
Removing Content
Pages
Deleting a page will remove all of the page’s content as well as any page bars linked to that page.
- Select the page to be deleted from the Goto menu
 .
. - From the Goto menu click Delete Current Page.
- When prompted click OK to complete the deletion.
Collapsible Sections
Use caution when removing a collapsible section, they often contain additional content such as buttons, text or images.
- Move the mouse cursor over collapsible section.
- Click the remove button
 that appears on the left side of the bar.
Content Blocks
- Move the mouse cursor over the rich text content block until the cursor changes to a text caret .
- Click on the content block to launch the rich text editor.
- Select all (Ctrl+A / ⌘+A) of the content and then press the Delete key.
- Click outside of the rich text editor to close the rich text editor and complete the removal of the content block.
Button Tiles
Button tiles can be removed in two ways. Firstly simply drag the tile outside the boundaries of the stage. Alternatively click the Remove button from the tile’s settings dialog.
Bars
Twitter, Google AdSense, pages, headers, collapsible sections, feed reader and the share bar all have a remove button ![]() that appears when the mouse cursor is over the element.
that appears when the mouse cursor is over the element.
Editing Content
Pages
A page bar’s title and linked to page can be edited.
Editing the title.
- Move the mouse cursor over the page bar’s title text until the cursor changes to a text caret .
- Click on the title text to launch the inline title editor.
- Update the title text and then press the Enter key or click outside of the title text editor.
Changing which page the page bar links to.
- Move the mouse cursor over the page bar revealing the Link to page menu
 .
. - Open the Link to page menu and select a new destination for the page bar.
Collapsible Sections
A collapsible section’s title text can be edited as well as additional content nested inside the section.
Editing the title.
- Move the mouse cursor over the page bar’s title text until the cursor changes to a text caret .
- Click on the title text to launch the inline title editor.
- Update the title text and then press the Enter key or click outside of the title text editor.
Nesting content inside a section.
- Simply drag the desired button tile or content block from the toolbar onto the stage.
Tips: Alternatively tiles and content blocks already on the stage can be dragged into the collapsible section as well.
Sections can only contain rich text blocks, images, video and button tiles. Nesting collapsible sections, pages or other bar-like elements is not permitted
Content Block
Launch a content block’s rich text editor by moving the mouse cursor over the block until the cursor changes to a text caret . Then click on the content block.
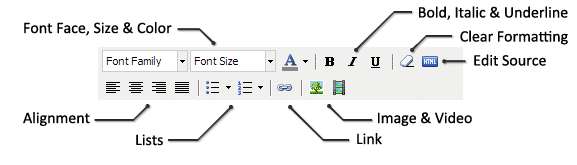
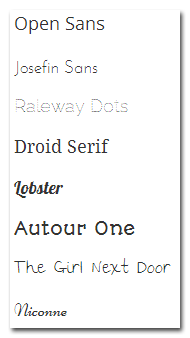
Web Fonts
The Content Block editor has 8 custom web fonts available for your use. Utilizing custom fonts brings a deeper level of creativity to your design.
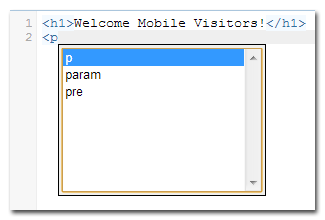
Using HTML
You can add or edit your own HTML using the Edit Source Code button, ![]() . When clicked, the Code Editor appears with the following options.
. When clicked, the Code Editor appears with the following options.
- Code Hinting
- Syntax Highlighting

- Apply Source Formatting
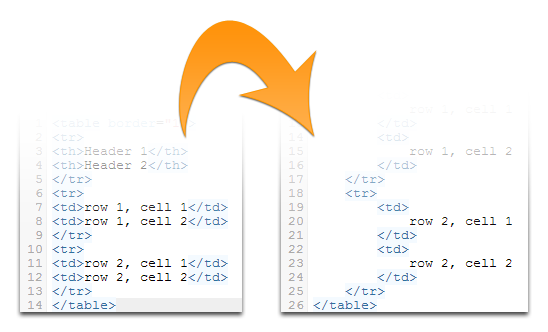
Image Editor
Utilize the Built in image editor (powered by Aviary) for a comprehensive suite of effects and tools.
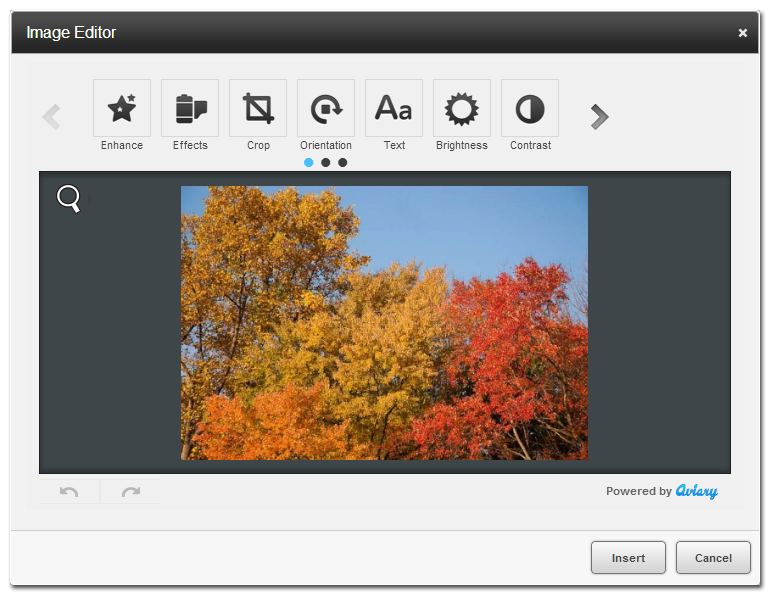
For a list of available tools, please look below.
![]()
Button Tiles
Edit tiles by moving the mouse cursor over the tile and then clicking the edit button ![]() in the upper right corner.
in the upper right corner.
You can also edit a tile by double clicking on it.The tile’s label text can be edited by moving the mouse cursor over the label until the cursor changes to a text caret ![]() , then clicking.
, then clicking.
FAQ
How do I redirect smartphone visitors from my desktop site to my mobile site?
How do I change the look and feel of my site?
How can I create a Custom SiteStyle?
How do I check my site’s traffic?
How do I change where my site publishes to?
How do I create a link that prompts a mobile visitor to send me a text message?
How do I sell my products or services through my mobile site?
How can I provide my visitors a way to reserve a table at my restaurant?
How do I create a carousel photo gallery?
Do you have an affiliate program and where do I sign up?
How does the affiliate program work?
How do I navigate the Affiliate Portal?
How do I use my referral codes or place my sign up widget?
How do I redirect smartphone visitors from my desktop site to my mobile site?
It’s great having a mobile site built just for your mobile visitors, but it’s a hassle to promote your existing desktop site address my-site.com and your new mobile site mobile.my-site.com. Why not just promote the one your visitors already know and have your new mobile visitors automatically taken to your new address. Here’s how...
- From the More menu launch the Site Settings dialog.
- Copy snippet of code from the “Redirect Smartphones to Your Mobile Site” field.

- Paste the snippet in between the HEAD tags your desktop site.
- Save and publish the changes to your desktop site.
How do I change the look and feel of my site?
SiteStyles are an easy way to dramatically change the look and feel of your entire site. Each SiteStyle consists of a color coordinated palette, buttons, and tile icons.
- From the More menu mouseover the SiteStyles submenu
- Slowly move the mouse cursor over each SiteStyle family. Notice the first color variation of each SiteStyle family is previewed on the stage.
- Most SiteStyle families contain several color variations, each selectable from the family’s submenu.
- When you find a style that you like click the corresponding menu item to apply it.
Alternatively you can create your own SiteStyle with custom colors by selecting the “Custom SiteStyle...” menu item.
How can I create a Custom SiteStyle?
- From the More menu mouseover the SiteStyles submenu.
- Select the Custom SiteStyle submenu item.
- The Custom SiteStyle window appears.
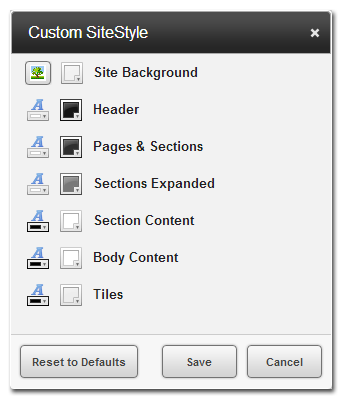
You can customize the following elements for your Custom SiteStyle:
- Site Background – The background of your mobile website—you can use an image, color, or a combination of both.
- Header – Each page has the option to use a Header at the top of the page.
- Pages & Sections – The bars for different pages and sections.
- Sections Expanded – Active bars for sections.
- Section Content Background – The background color of a Section—Can also utilize transparency.
- Content Background – The background of a Content Block—Can also utilize transparency.
- Tiles – The various Button Tiles such as the Call Button and the Coupon Button.
- Text Color - To the left of each element there is a color selector to edit the text color.
- To select use an image, select the Image icon
 .
. - The Browse Window appears, locate the image you would like to use and select it and then click Open.
If an image is 365px or below, Mosaic will automatically tile the image for a seamless background. If the image is 366px or larger it will stretch to fit, keeping the aspect ratio.
Both the Section Content Background and the Content Background can utilize transparency on the color selected.
- To adjust transparency, select one of the two transparency enabled elements.
- The Color Selector Window appears
- To the right of the Hue slider is the transparency slider.
![]()
- Slide up to decrease transparency, slide down to increase it.
- Once your adjustments are complete, click Save.
The Custom SiteStyle is automatically applied.
How do I check my site’s traffic?
After your site has been published for a few days and you’ve begun promoting it on search engines and to your existing audience, then traffic will slowly start to build. Here’s how to keep tabs on your traffic analytics...
- From the More menu launch the Site Analytics dialog.
- Use the two date picker fields to set the date range and then click the Update button to refresh your site’s analytics.
How do I change where my site publishes to?
Your mobile site can be published to either a subdomain (ex. my-site.gomo.pro) or your own domain* (ex. my-site.com). Here’s how to change your publishing destination...
Free Subdomain
- From the More menu launch the Site Settings dialog and locate the “Free Subdomain” section consisting of two fields.

- In the text field replace the “default-##” text with your desired subdomain. The subdomain must only contain alphanumeric characters and dashes.
- From the drop-down field choose one of the predefined domains to pair with your subdomain.
Custom Domains*
- From the More menu launch the Site Settings dialog and locate the Site Domain(s) section.

- Click the “Use an existing Domain” button.
- Enter a domain that you own.
- Update the domain’s DNS to:
NS.RACKSPACE.COM
NS2.RACKSPACE.COM
*Publishing to domains is limited to subscribed customers only
How do I create a link that prompts a mobile visitor to send me a text message?
You can use sms protocol when creating links within a content block. The protocol is:
sms:15554443333@carrier.site.net
Select the text you would like to link in your content block by highlighting and selecting the link option ![]() .
.
In the link dialog box, type in the sms address you wish visitors to contact you through.
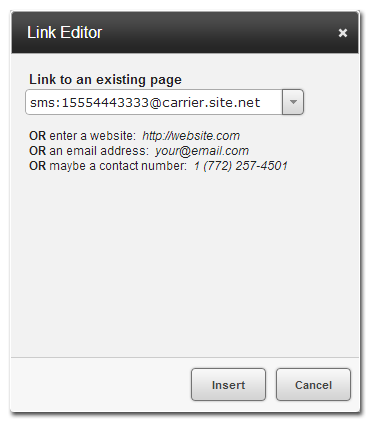
The users phone will open the default texting application with your address pre-populated.
How do I sell my products or services through my mobile site?
Drag the E-Commerce tile, ![]() , onto your Stage to provide mobile visitors the ability to purchase your products with PayPal or Google Checkout. The E-Commerce settings window appears. Select your preferred Provider.
, onto your Stage to provide mobile visitors the ability to purchase your products with PayPal or Google Checkout. The E-Commerce settings window appears. Select your preferred Provider.
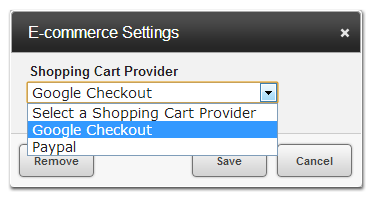
Once you have selected a Provider, fill out the fields that appear.
Google Checkout
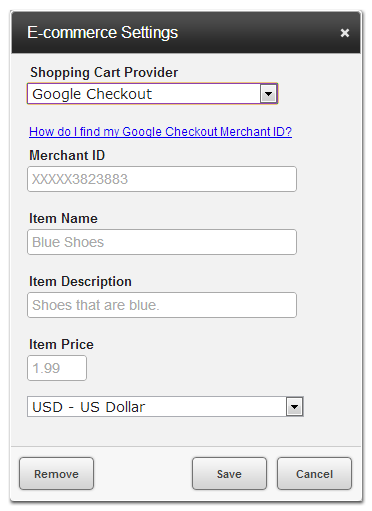
- Merchant ID - A unique, numeric code that Google Checkout has assigned to your business.
- Item Name - The name of the product/service that you are providing.
- Item Description - A brief description of your product/service.
- Item Price - The selling price of your product or service.
- Currency - The currency that you wish to use.
PayPal
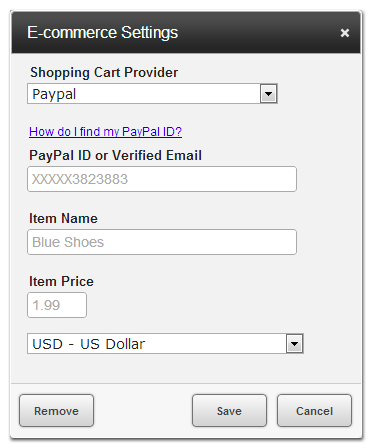
- PayPal ID or Verified Email - The ID or verified PayPal email address that PayPal assigned to your business.
- Item Name - The name of the product/service that you are providing.
- Item Price - The selling price of your product or service.
- Currency - The currency that you wish to use.
Once published your visitors will be able to purchase your product or service that you have setup.
How can I provide my visitors a way to reserve a table at my restaurant?
Drag the OpenTable tile, ![]() , onto the stage to provide your mobile visitors a convenient way to reserve a table at your establishment. The OpenTable settings window appears. Fill out the fields that appear.
, onto the stage to provide your mobile visitors a convenient way to reserve a table at your establishment. The OpenTable settings window appears. Fill out the fields that appear.
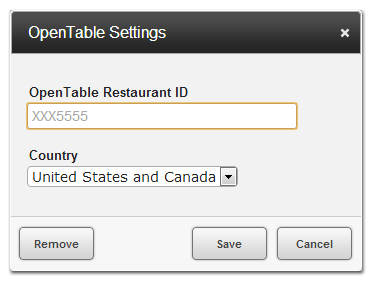
OpenTable Restaurant ID - A unique code that OpenTable has assigned to your business.
Country - The Country that your restaurant is located.
Once published your visitors will be able to reserve a table at your restaurant on their mobile or tablet device.
How do I create a carousel photo gallery?
Drag the Image Carousel tile, ![]() , onto the stage to start the editing process. The editing dialog window appears.
, onto the stage to start the editing process. The editing dialog window appears.
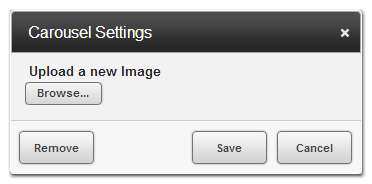
Click the Browse button to locate the images you would like to use. You upload one at a time.
You can modify the Height of the images in your gallery by using the slider within the Carousel Settings dialog window.
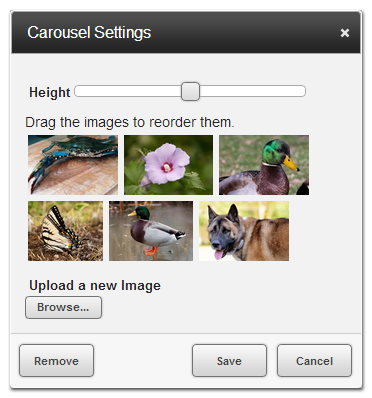
To reorder your gallery images, simply drag them to their desired location inside the Carousel Settings dialog window.
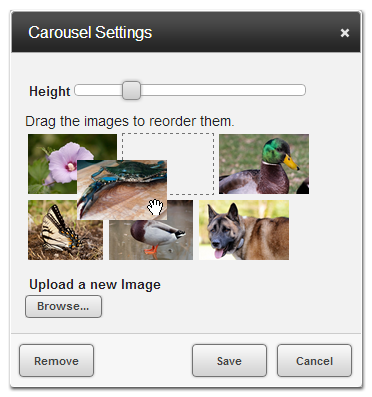
Click the Browse button again to add as many images as are needed.
Once you are done editing, click the Save button.
After your site is published, the carousel gallery will be available to the mobile world.
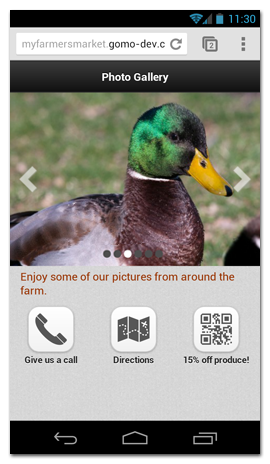
Visitors to your mobile site will be able to navigate the gallery with the right and left arrows, by swiping left and right or by tapping the circle icons a the bottom of your gallery.
Do you have an affiliate program and where do I sign up?
Yes, there is a NetObjects Mosaic Affiliate Program. You can sign up from the Mosaic home page. Look for the Become an Affiliate link in the footer.
![]()
You can also sign up here.
How does the affiliate program work?
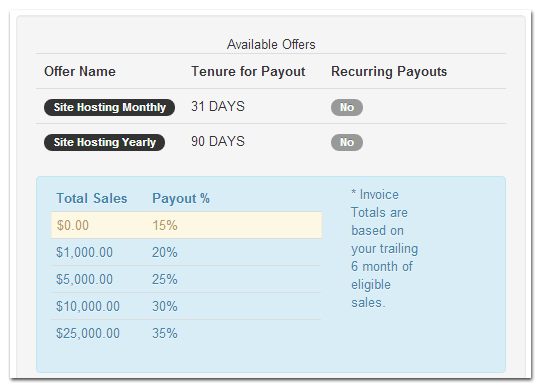
Our affiliate program is on a tiered commission scale. Eligible products include:
- Site Hosting Monthly
- Site Hosting Yearly
There is a minimum Payout Balance of $100.00 and for payments over $250.00 there is an additional review process in place.
The commission scale is calculated based on a prior 6 month rolling average of monthly sales. The table below outlines the scales and payout:
Total Sales |
Payout % |
|---|---|
| $0.00 | 15% |
| $1,000.00 | 20% |
| $5,000.00 | 25% |
| $10,000.00 | 30% |
| $25,000.00 | 35% |
In addition to the above rules, monthly hosting conversions must have 31 days of tenure before revenue is eligible for payout. Annual is 90days.
Affiliates get access to a portal where they can track signups, conversions, payouts, and projected future payouts. They can also generate affiliate links and signup widgets. Click here for further details.
How do I navigate the Affiliate Portal?
We'll break down the affiliate program portal screen into four parts, they are:
- Overview
- Sales Totals by Day
- Available Offers
- My Referral Codes
- Navigation
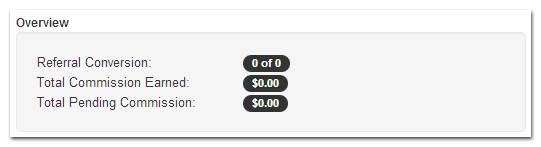
Overview
A quick breakdown of your conversions, commission earned and pending commissions.
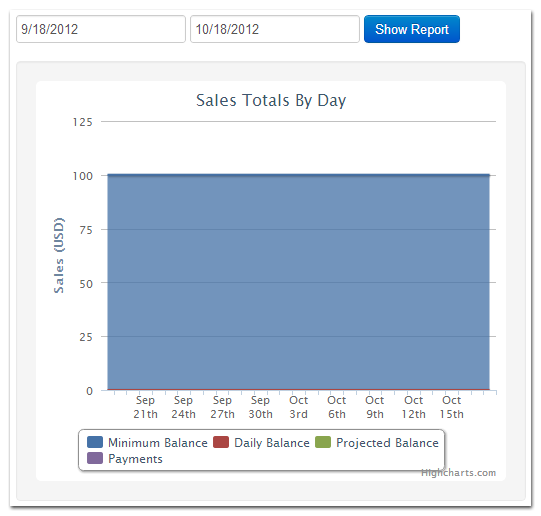
Sales Totals by Day
View your referral statistics under the Sales Totals by Day section. You can generate reports by date ranges and see the following analytics:
- Minimum Balance
- Daily Balance
- Projected Balance
- Payments
Available Offers
View your available payouts and reoccurring payouts from the Available Offers section. You'll also see what tier you're payments are currently in.
My Referral Codes
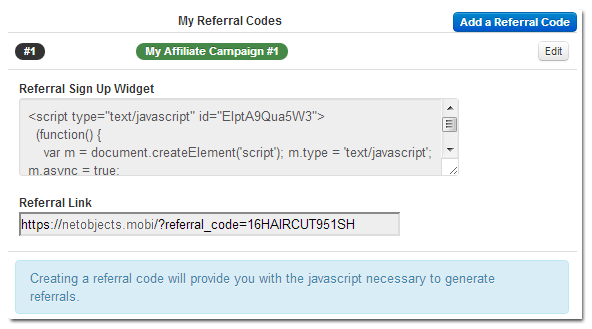
You can generate referral codes or a sign up widget to place on your website. Referral codes contains a unique id that is connected to your account, letting us know that you sent the referral (so you get paid). There is also a referral link that is generated that you can give out to users or link to from your website (mobile or desktop). To add a new referral code, click the Add a Referral Code button. The Add a new Referral Code window appears.
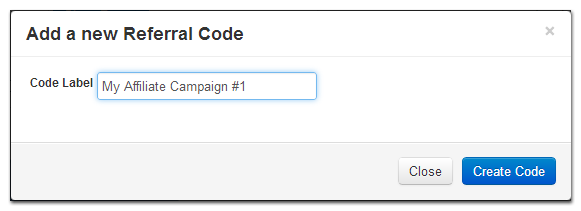
Provide a name for your new referral code, we've used My Affiliate Campaign #1 above. Click the Create Code button. Your new referral code and Sign Up Widget have been created.
Navigation
There is a simple navigation along the top of the affiliate portal that consists of:
- Dashboard - The affiliate portal dashboard.
- My Profile - A link to edit your account settings.
- Mosaic - A link to the Mosaic editor.
- Logout - Logs you out of Mosaic and the dashboard.
![]()
![]()
How do I use my referral codes or place my sign up widget?
The referral links that are generated can be used just as any other link. Give it out, put it in an email, etc. When you created your referral code, a small script for a Sign Up widget is also created. This widget can be placed on your website for visitors to sign up for their own account (with your unique ID).
- How to place the Sign Up Widget inside NetObjects Fusion?
- How to place the Sign Up Widget in my HTML?
In either of the above scenarios you'll need to copy the Sign Up Widget code from the dashboard. You can do this by clicking inside the Referral Sign Up Widget code box. It will auto-highlight the entire code block for you. Right click the highlighted area and select Copy from the contextual menu (you can also click CTRL + C after it is highlighted). The code is now copied to your clipboard.
How to place the Sign Up Widget inside NetObjects Fusion?
Open your desktop website in NetObjects Fusion (any version) and navigate to the page you would like to widget to appear on. Draw a text box onto your page. Click inside the text box and then click CTRL + T. The Insert HTML dialog window appears. Right click inside the dialog window and select Paste.
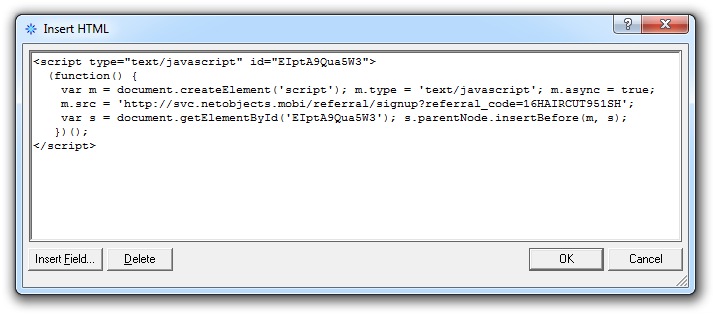
Click OK and publish your website. The sign up widget is now live.
How to place the Sign Up Widget in my HTML?
You can place the sign up widget HTML anywhere between the <body></body> tags in your HTML.