After you have placed the Forms Handler Component on your site, you can configure its settings in the Forms Handler dialog box. The Forms Handler dialog box contains three tabs: Fields, Page and General.
You can customize the appearance and the content of the form in the Fields Tab of the Forms Handler dialog box.
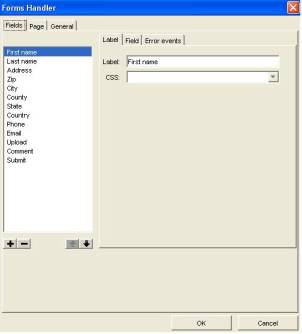
Customizing Appearance and Settings on the Fields Tab
On the Fields tab, you can customize the appearance of the form. The fields that will appear on the form are displayed on the left side.
· To add a new field, click the "+" button.
· To remove a field, select the field and click the "-" button.
· To change the order of the fields as they would appear on the form, click the field name and move them by clicking the up and down arrows.
The following are the default form field:
· First name: the first name of the person who submits the form.
· Last name: the last name of the person who submits the form.
· Address: the address of the person who submits the form.
· Zip: the zip of the person who submits the form.
· City: the city of the person who submits the form.
· County: the county of the person who submits the form.
· State: the state of the person who submits the form.
· Country: the country of the person who submits the form.
· Phone: the phone of the person who submits the form.
· E-mail: the e-mail of the person who submits the form.
· Upload - the user can upload a file using this file field.
· Comment – any comments from the user can be inserted in this field.
· Submit - this button will submit the form to the server (*)
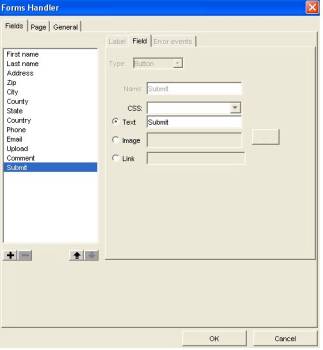
There are several possibilities for displaying the form Submit button:
· Text: select the Text option; the text written in the input field will be displayed on the button.
· Image: select the Image option, then the picture you choose with the ‘…’ button, will behave as a button – the user will be able to click on it in order to submit the form.
· Link: select the Link option, and then a link will be displayed on the page. This link will act in the same way as a normal button.
Applying a Cascading Style Sheet
In the Forms Handler dialog box, you can apply a Cascading Style sheet to the HTML fields. More than one CSS name can be added and stored in the CSS drop-down box, but only the selected CSS will be active.
1. In the Layout Properties window, click the HTML button.
2. In the HTML dialog, click "Between head tags".
3. Type in <Style>
4. Click the "Insert File" button and choose a CSS file. For example the file "samplecss" from Fusion Installation Directory / Components / NetObjects / Forms Handler / goodies /. You can find CSS classes in this file. The names of these classes can be added in the CSS list.
5. Type in </Style>.
6. Open the component
editor, then in the CSS field fill the CSS class name you want to be applied.
(e.g. Suppose that your css file contains a class named MyLabel, in the
CSS field you have to fill the name MyLabel)
You can specify a different class for every label or text field element
but this class must exist in the included CSS.
Setting Error/Success Handling Options
After filling in the Forms Handler form, the site visitor will click the Submit button. If the site visitor has filled in the fields correctly, a success page will appear. If the site visitor has filled in some fields incorrectly, the browser will refresh the page and display an error message, and the fields that are not correct will be pointed with an error marker.
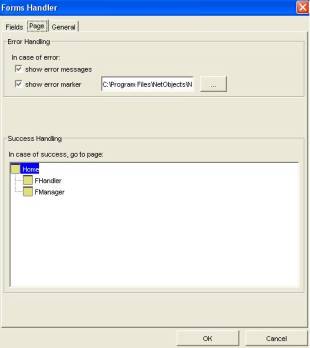
You can configure settings for error messages and error markers on the Page tab.
Setting Error Handling Options
In the Forms Handler dialog box, click the Page tab.
· Check the Show error messages check box to display error messages when error events occur in the browser (when the site visitor fills in incorrectly a field). The error messages will be displayed beneath the controls at the bottom of the page.
· Check the Show error marker check box to display an error marker (symbol) to indicate the invalid input text, when the site visitor incorrectly fills in a field. The error marker will be displayed between the field's label and the field.
· Use the … (browse) button to choose a different image for the error marker.
Setting Success Handling Options
In the Forms Handler dialog box, click the Page tab.
1. In the Success Handling field set, choose the page where the site visitor will be redirected to after successfully submitting the form. If the form is submitted without errors, the user will be redirected automatically to the selected success page.
2. If an error occurs while processing the submitted form data, the site visitor will be redirected to the same page and error messages and markers will be displayed.
Setting Script and Server-Side Settings
In the Forms Handler dialog box, click the General tab.
Here you will specify the Forms Handler suite general settings. These settings can be saved as a profile and used later for other components suites.
The General tab contains three sections: Script settings, Database settings and E-mail settings.
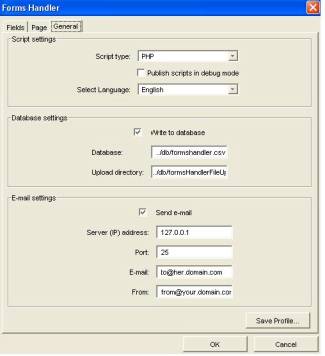
Script type: Select the scripting language from the Script type drop-down box. Depending on what kind of server you have, choose one from the two scripting languages: Active Server Pages (ASP) / PHP Hypertext Preprocessor (PHP) (Version 4.1.0 or later). Check with your Internet service provider to determine which option is appropriate for your hosting environment.
Publishing in debug mode: When you publish your site for the first time, it could be a good practice to check the ‘Publish in debug mode’ checkbox. Publishing the site in debug mode will help to see on screen a complete description of an error that can occur. After identifying and solving all the problems on the server and client side, you can un-check that checkbox and re-publish the site. All errors will be described by their error codes. Then re-publish the site in live mode. Debug mode forces the script to show a detailed report message when an error appears, not just an error code as it would appear if the option were not selected.
Select Language: Here you choose the language for all the messages generated by the scripts, such error messages or components text for which the user does not have access to customize them using components configuration interfaces.
The Database settings section
Write to database: If you enable this checkbox, you choose to keep a database file in your site directory.
Database: Here you will specify the database file. This file is saved relative to the `scripts` site directory, which means if you use relative path to specify the location of the file, this location will be relative to the `script` directory. For example if you enter there just the file name "file.csv" this means the file is saved into the `scripts` directory. This is not recommended because the `scripts` directory must have write permission for the Web server user and this is a security lack for you site. The best solution is to set the location of the database file outside of the public directories.
The
recommended place for the database file is where the Web users have write
access but do not have browse access.
The database that you have specified in the component’s editor will store
the input values. You can choose the path to the database. It is an absolute
full path, containing the file name, too. If you do not type-in an absolute
path, and instead, type-in only a file name, the scripts on the server
side will create the database inside the scripts directory of your published
site.
Upload Directory: Here you will specify the path to the directory where the files will be uploaded. It can be a relative path to the scripts directory of the site. For example, if you type in ‘test’ in the Upload Directory field, the file will be uploaded to the ‘test’ directory from the scripts directory of the site. In you type in ‘../test’, the files will be uploaded in the ‘test’ directory from the root of the site.
The Email settings section
Send e-mail: Check the Send e-mail option and an email will be sent after each form submission. The e-mail will contain all the data fields. All the files that are uploaded on the server will be attached to the e-mail.
Server IP address: Select a server IP address to send/receive emails. The PHP will use the IP server address specified in the php.ini file on the server and the ASP will use the default windows IP server if you leave this field blank.
Port: The email server port usually has the value 25. You need to ask your Internet Service Provider which is your email server port number.
E-mail: The E-mail field is the email address that will be used if an e-mail is being sent to the site administrator.
From: The From field is the email address that will appear in the From field when an email will be sent by this component. This email address must have the correct format; otherwise, the email sent by the component cannot be delivered by your provider’s email SMTP server.
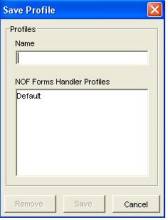
Click the Save Profile button to save the general settings you have completed. The Save Profile dialog box will open.
Advanced Settings:
Settings for ASP:
You need:
1. IIS 5.0 or above
2. VBSCRIPT 5.0 or above (this implies the installation of IE 5.0 or above)
Simple Mail Transfer Protocol services installed on your machine after the site is published. You need to give write access to the Internet user to the directory where the databases files are stored (to find where are these files located please check the component’s `database prefix` field value located under the `General` tab).
Settings for PHP:
You need PHP 4.3.1 or above. Specify the SMTP server address in the 'php.ini' file. For example - for Windows, in c:/winnt/php.ini: SMTP = 129.237.125.27
In RedHat Linux 8.0/9.0 there is an additional PHP config file, /etc/httpd/conf.d/php.conf which specifies the LimitRequestBody. Increase the number on the line to be more than the maximum size limit (in bytes) you have set for your file uploads in the Forms Handler Component. For example, if you have set 2MB as the maximum size of the files that can be uploaded, then, set LimitRequestBody to 2097152. In the 'php.ini' file:
1.
Set the 'file_uploads' to '1'
or 'On' to allow for file uploads:
file_uploads = On
2. Set the 'upload_max_filesize' to more than the allowed maximum size of uploaded files. For example, set it to 2 Mega bytes: upload_max_filesize = 2M
3.
Set the temporary directory for file uploads to whatever you prefer:
upload_tmp_dir = C:\php4.3.4\uploadtemp
4. Set the 'post_max_size' to more than the size of file uploads you want to allow: post_max_size = 8M
Make sure you have created the file upload directory and the database directory and set the right permissions on them:
· mkdir /home/users/me/uploads
· chmod 777 /home/users/me/uploads
· mkdir /home/users/me/ Forms HandlerDB/pageslog.cvs
·
chmod 777 /home/users/me/ Forms HandlerDB/pageslog.cvs
Publishing information
When you add the component object to a page in NetObjects Fusion and preview it, you will see a placeholder graphic. To see how the Forms Handler Component works, publish the site remotely (for more information on publishing remotely, refer to the NetObjects Fusion online Help).
The code generated by the NetObjects Forms Handler is evaluated on the server. It is important that you verify if your server supports the server side language that you are using. For information on server requirements, please contact your hosting provider or refer to your platform documentation.
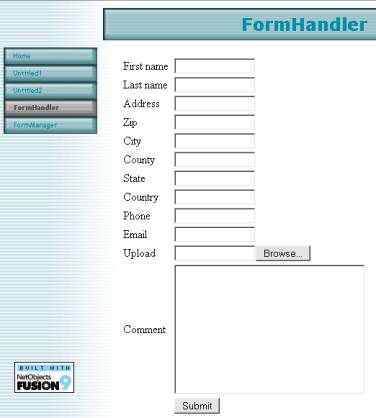
The result will be a form placed on the page where the users will introduce their personal information and submit it to you, as displayed below:
Advanced Help
E-mail Templates
The e-mail template for
the Forms Handler Component is named Forms HandlerTemplate.properties
and is located in Fusion’s Installation Directory/Components/NetObjects/
Forms Handler/email/.
The value of "sendEmail" can be true or false;
if it is true, the e-mail is send, if it is false
the e-mail is not send.
The "subject" value indicates the subject of the e-mail.
The "from" value indicates the e-mail address of the sender.
In "body" value you can write the message to the user.
"\n" means "new line".
The "\" at the end of the line indicates the string continues
on the next line.
You can see below the placeholder’s
value for this template: in "Forms
HandlerTemplate.properties", {0} is the only placeholder. When the
e-mail is sent, {0} is
replaced with the pair: field name/field value. If you have more than one
field in your form, which would normally, be the case, then {beginiterator}
and {enditerator} will separate the information of each field.