Using the options in the Paragraph Settings dialog, you can set formats for the text in a paragraph, the paragraph alignment, spacing, margins, indents, paragraph border, and paragraph background.
When you format paragraphs, type all the text first and then go back and apply the formatting. If you set formats as you enter the text, new paragraphs inherit the style of the paragraph before it.
Note:
Some options in the Paragraph Settings dialog have no effect if text
formatting is set to HTML. These options are marked CSS only in the following
sections. If you apply these options, you see them in Page view, but they
disappear when you preview or publish the site. Be sure to test your site
in all target browsers to ensure pages display as you intended.
Formatting Text in a Paragraph
Position the insertion point in the paragraph you want to format. You do not need to select text.
On the Format tab of the Text Properties palette, click the Format button.
The Paragraph Settings dialog appears.
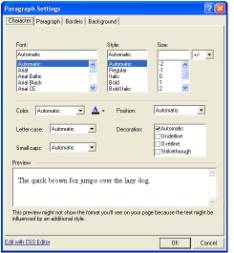
In the Paragraph Settings dialog, click the Character tab.
Set the text format options. If you choose Automatic, the settings for the parent style pass through to the paragraph. See Understanding the Automatic Setting.
Font applies the text font; the list of fonts is derived from the font map in the \NetObjects System folder.
If the specified font for the formatted text is installed on the site visitor’s system, HTML 3.x-compatible browsers display your text using this font. If the font is not installed, the browser checks a substitution table. If the specified substitution is not possible, the browser uses its default font. You can change the substitution table by editing the fontmap.txt file in the \NetObjects System folder.
Style applies a style to the text. You can select regular, italic, bold, or bold italic.
Size sets the size of the text. You can choose the unit for specifying the font size from the drop-down list to the right of the size field.
You can choose any size up to 22192 pt., but the actual font and size site visitors see is based on their browser default setting and therefore is unpredictable. Also, some older browsers do not support all sizes. For those reasons, it is best to use the relative settings (such as -2 to 4). Then, when site visitors increase or decrease their browser font sizes, text size also increases or decreases. But if you use an absolute font size such as points, inches, or picas, the text on your pages stays the same size even if site visitors want to see it larger or smaller.
Color applies color to the text. The color box shows the current text color. To change the color, click the color box and select a color from the Color Picker.
Letter case sets the case (uppercase or lowercase) of the text. Use the Capitalize option to set initial caps, which capitalizes the first letter of each word in the text. Choose None to remove a letter case format set at a higher level.
Small caps sets the text to appear in all small caps. If small caps is selected, it overrides the Letter case setting. Not all browsers support small caps. Choose None to remove a small caps format set at a higher level.
Position sets the text to be subscript or superscript. Choose Normal to remove a position format set at a higher level.
Decoration sets the text to the selected decorations. You can select underline, overline (CSS only), and strikethrough.
Edit with CSS Editor opens the CSS Editor window where you can type or paste cascading style sheet definitions for greater site-design flexibility. The style added in the CSS Editor can be applied by selecting it in the Style drop-down list on the Text Properties palette. See Using the CSS Editor.
Setting Paragraph Alignment, Spacing, and Margins
Position the insertion point in the paragraph you want to format. You do not need to select text.
On the Format tab of the Text Properties palette, click the Format button.
In the Paragraph Settings dialog, click the Paragraph tab.
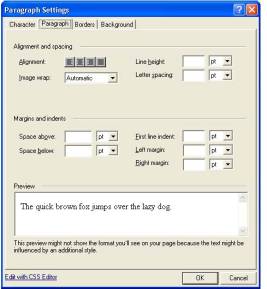
Set paragraph format options. If you choose Automatic, the settings for the parent style pass through to the paragraph. See Understanding the Automatic Setting.
Alignment sets the alignment to left, center, right, or block. Changing alignment here also changes the alignment setting on the Text Properties palette. If no button is selected, the text is aligned using the default alignment.
Image wrap (CSS only) sets how text can wrap around an image. You can choose left, right, or on both sides of the image. To apply wrap settings to a particular image, use the Picture Properties palette. This feature is most useful when creating text styles. See Creating a Text Style.
Line height (CSS only) sets the amount of space between lines of text in the selected unit of measurement.
Letter spacing (CSS only) sets the amount of space between characters in the text in the selected unit of measurement.
Space above (CSS only) and Space below (CSS only) set the amount of space above and below paragraphs in the selected units of measurement.
First line indent sets the tab space indent for the first line of text in the selected unit of measurement. This is the only way to indent a paragraph without using the space bar.
Left margin (CSS only) and Right margin (CSS only) set the margins on either side of the paragraph in the selected units of measurement.
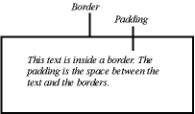
Setting Borders and Padding (CSS only)
Borders are lines around a paragraph. Padding is the amount of space between the border lines and the text. If no border is set, padding can mimic margins around text.
Note:
Browsers can interpret your border and padding settings differently.
Check the appearance of objects with borders and padding in different
browsers to make sure the object appears as you intended.
Position the insertion point in the paragraph you want to format. You do not need to select text.
On the Format tab of the Text Properties palette, click the Format button.
In the Paragraph Settings dialog, click the Borders tab.
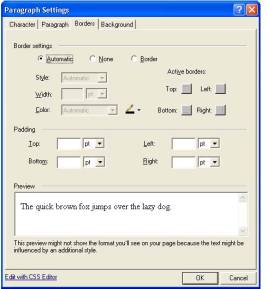
Select border settings. If you choose Automatic, the settings for the parent style pass through to the paragraph. See Understanding the Automatic Setting.
Automatic applies the default border setting.
None prevents the parent element’s border settings from being applied.
Border makes the other options available so you can apply individual border settings. Use:
Style, Width, and Color to set the border’s line style, width, and color. Click the Color box to select a color from the Color Picker.
Active borders to specify which borders appear around the paragraph. All four segments are selected by default, which adds a complete box around the paragraph. You can click any combination of segments.
Select the amount of padding you want at each side of the paragraph.
Setting Background Options (CSS only)
Position the insertion point in the paragraph you want to format. You do not need to select text.
On the Format tab of the Text Properties palette, click the Format button.
Click the Background tab.
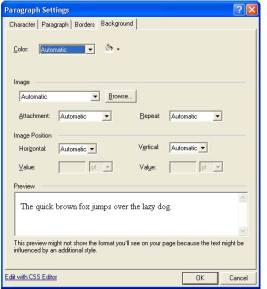
Set the background format options for the paragraph. If you choose Automatic, the settings for the parent style pass through to the paragraph. See Understanding the Automatic Setting.
Color sets the background color behind the text. Click the Color box to select a new color from the Color Picker.
Image sets the background to an image. Click Browse to select an image.
Attachment sets the background image to either remain fixed or scroll as the text scrolls. This option applies only to Microsoft Internet Explorer 4.x.
Repeat sets how the image displays behind the text. Choose None to display a single image that does not repeat. Select Both to fill the background entirely with the image. Select Horizontal or Vertical to display a row of images horizontally or vertically behind the text.
The horizontal and vertical settings do not work with many browsers. Do not use this feature unless you expect your site visitors to use Internet Explorer 5.0 or higher for Windows or Internet Explorer 4.5 or higher for the Mac OS. Netscape Navigator 4.7 and earlier do not use this feature properly.
Image Position sets the initial position of the background image. This feature is supported by Internet Explorer 3.0 and higher, but is not supported by Netscape Navigator 4.7 or earlier. To set the position to a specific value, select Value from the Horizontal and Vertical drop-down lists and enter a value for the position in the selected unit of measurement.
To position the image correctly in browsers, the horizontal and vertical values interact. Note that when you change the setting for the horizontal or vertical position, the other setting changes accordingly.