New navigation bars use the current SiteStyle, but you can apply button sets associated with any SiteStyle to a page. See Adding Banners and Buttons.
In addition, you can apply advanced settings, such as how the fly-out submenus are displayed on the page, to a custom navigation bar. If you change the style of a navigation bar in a MasterBorder, it changes on every page using that MasterBorder.
To create a custom navigation bar:
In Page view, select the navigation bar.
Click the Style tab of the Navigation Bar Properties palette.
In the Button Style section, click Advanced.
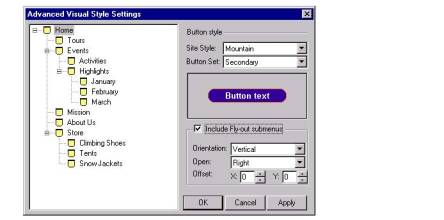
The Custom Style dialog appears.
Select a page level from the site structure list on the left that you want to customize.
Select the Site Style and Button set you want to use for the page level selected in Step 4.
Only active styles will appear in the Site Style drop-down list.
Select Include Fly-out submenus to make child pages not included in the navigation bar visible when the site visitor moves the pointer over the parent page link.
The advanced Fly-out submenu settings will become active.
Orientation displays the fly-out submenu horizontally or vertically.
Open describes how the menu will unfold.
Offset defines the position of the fly-out submenu.
Click Apply to save the current page level settings.
Repeat steps to apply custom styles to additional page levels or click OK to close the Custom Style dialog.